Sunday, October 6, 2019
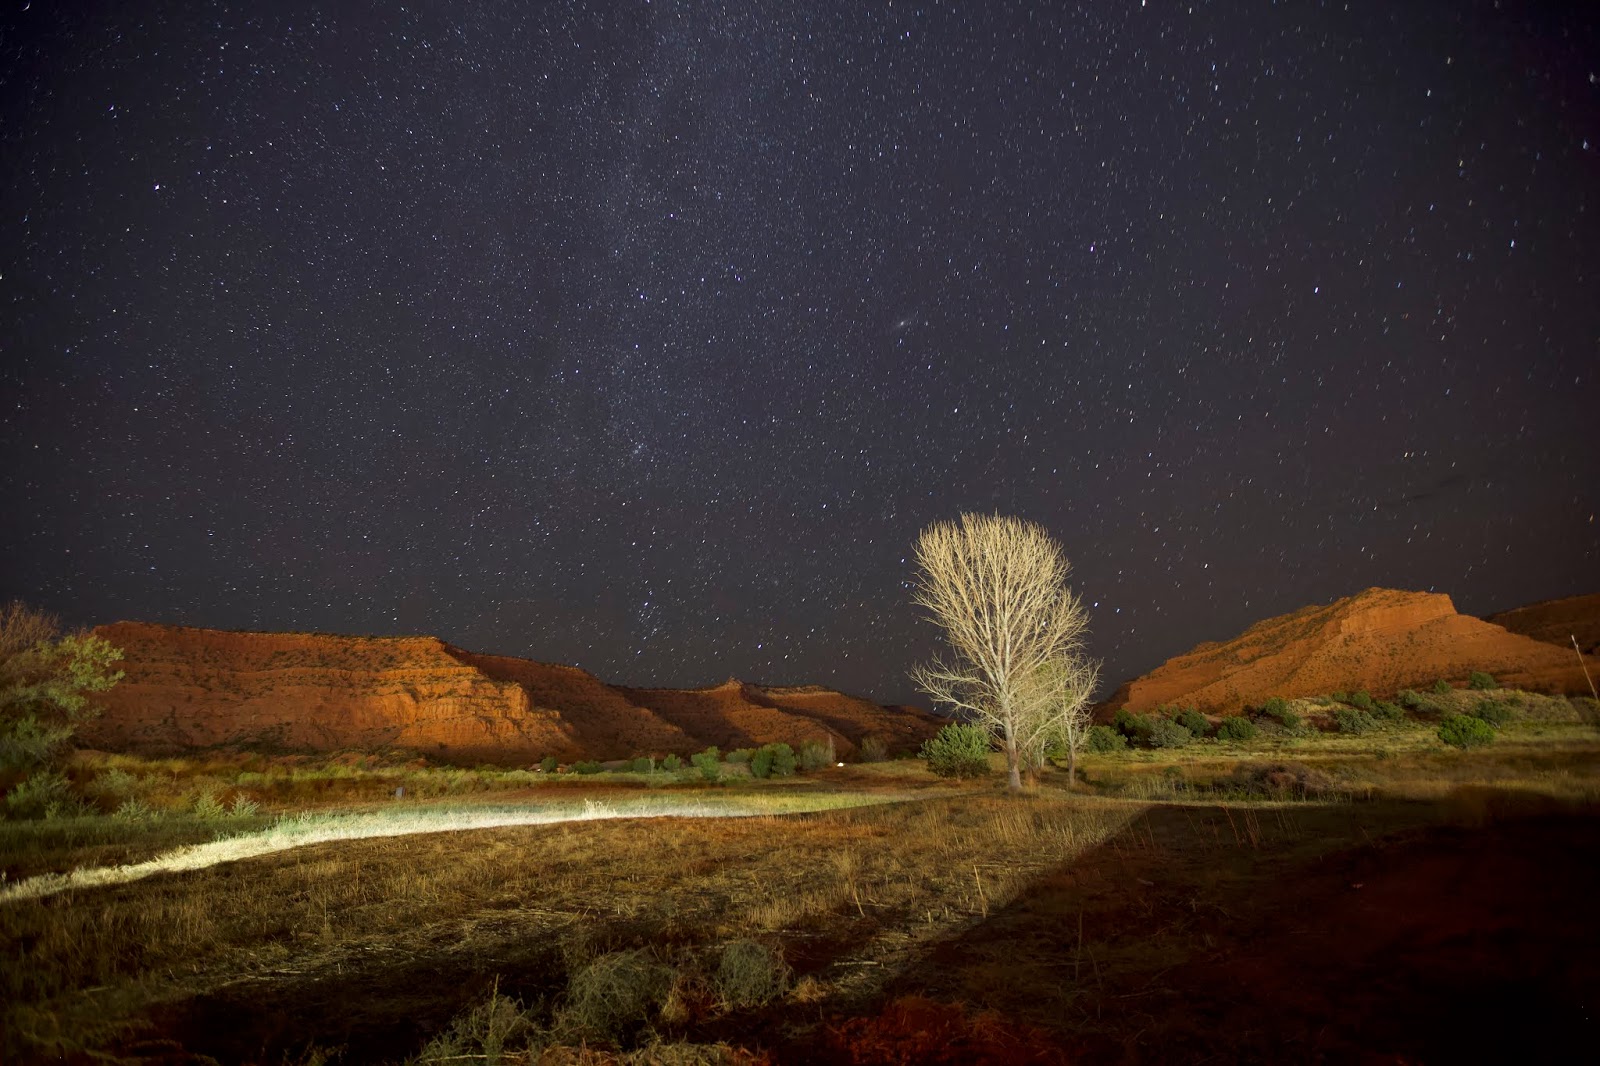
The Milkyway, from the American Southwest.
Travelled to Kanab, Utah to (among other things) try my hand at photographing the Milkyway.
On the first night in town, we headed out to a star-party on the outskirts of town. While there was still some cultural light in the area (a nearby house off to the left of the photo), we were still able to capture 60 second exposures without washing out the image. In this one, you can see the Milkyway band reaching up vertically from the horizon, with the Andromeda Galaxy (M31) just right of center.
I used my Canon 5D Mii full frame camera at 1600 ISO, sitting on a Manfrotto tripod with my Canon 16-35mm L f/2.8 Series II wide angle zoom at 16mm. This exposure was 59 seconds, and we did not use the Astrotracker this evening.
I think the amazing desert plateaus add much to the image, and I felt it was worth the tradeoff of light pollution to try staying in town for a short imaging session.
Later on I headed south of town about 8 miles to see how much more I could get...
This was from a quiet road a few miles south of the Utah-Arizona border. Same configuration except this was zoomed to 21mm, using a 2:18 second exposure and I did use the astrotracker.
Friday, March 29, 2019
Recent wide-angle DSLR shot
Limited opportunities to image this week, for several reasons. Posting this image I took at 2130 last Saturday at a fairly dark site using my Canon 5D Mk II, and my 16-35mm f/2.8 zoom at 35mm focal length. It was a 30 second exposure using my Skywatcher AstroTracker travel mount (ISO 1600).
Just labeled a few objects in the field of view for orientation. With fewer clouds, the site should prove very friendly to some imaging in the future. I think it's pretty, even with the under-lit clouds rolling in.
Monday, March 11, 2019
Comet PANSTARRS C/2011 L-4 (taken on 15 March 2013)
Just a quick post, its been a while since I've added anything.
Looking through some old files, I rediscovered an image I had taken with my Canon 5D Mark II when PANSTARRS C/2011 L-4 was at perihelion in 2013. Image was taken just after sunset, from Seaford Virginia with a 0.8 second exposure on a 50mm lens at iso 640. I like the trees in the foreground giving a bit of scale to the image.
PANSTARRS L-4 is a non-periodic comet, so no more chances to see this one.
I've been helping a friend with his observatory, so not much imaging of my own lately to share for now...
Saturday, February 16, 2019
Abell 21, a planetary nebula in Gemini, also known as the Medusa Nebula due to the appearance of striations in the nebulosity resembling the snakes of Medusa's hair.
Taken on the night of 12-13 Feb 2019 at Whorley. I used my 5” Explore Scientific refractor with no changes to the configuration. Imaging encompassed 120 light frames of 30 seconds each across luminance, red, green and blue filters, equating to 1 hour of light data. Full calibration data was taken after the lights as well. Significantly, this is my first full rgb imaging session to include autoguiding throughout the imaging. I did, at the time, feel the guiding was being overly aggressive, and that the RA axis was over-correcting. However, the finished product, with round stars required no deconvolution tells me the guide must have been okay.
The nebula is an old planetary, and considered to be dim (8” scope recommended...) Well, 5” works too apparently.
Processing of the lights and calibrations were all on PixInsight. Will describe that process in an update.
Regards,
Mark J
Sunday, January 6, 2019
Horsehead Nebula - imaging and processing
Dark skies during last Friday's moonless night gave me a chance to work on imaging. I used my 127mm Explore Scientific APO refractor with the Moonlight focuser, the QHY5III174 monochrome imager, my SSAG guider on the 80mm piggyback scope, all mounted on the Losmandy G11 mount and driven by SkyX Pro via my MacBook running Parallels. Filters were the Baader LRGB 1.25" set, mounted in a Skyris manual filter wheel. A previous-night QHY Polemaster polar alignment proved to remain pretty tight.
This is the result of fifty images per color and fifty more for luminance, also incorporating my guide camera through SkyX. Finished up with 25 images each for Flat, Dark and Bias calibration.
Only 20 second exposures for each science image... I chose 20 seconds due to some issues I've been having with the GHY5III174 monochrome camera reading-out early, before the duration is over, on occasions where I set the exposure length longer than about 30 seconds. Still troubleshooting that issue.
I found that the guiding plot chart on SkyX showed what I assessed to be too much correction in Declination axis when I checked during the first set of images. This settled down very well once I decreased the 'Aggressiveness' setting for SkyX guiding. I did not reshoot the images though, so I know I can improve results in the future. I will work on improving my guiding optimization next time too, since R.A. guiding looked a bit rough harsh as well.
Processing the approximately 300 images was done via PixInsight. I'm a newbie on using the software for anything more than a quick histogram correction, but after all day Saturday working through book 'Inside PixInsight' by Warren Keller, I'm figuring out a workflow to integrate, calibrate and correct monochrome images... next time it will be a lot quicker. I'll write more about that process later.
Lots more to learn on processing, but I'm ready to call this image presentable. The size and framing of this image make it difficult to tell what parts of the diffuse glow is from skyglow and what parts are part of the nebula, so I limited my processing so that I don't unnecessarily remove actual detail from the image.
I plan to come back to this target once I fix my camera readout issues so I can get longer exposures and bring more of the color that is clearly visible here. Thats all for now.
Mark J.
Saturday, October 6, 2018
Solar Eclipse retrospective
I began my interest in solar eclipses shortly before the 11 July 1991 eclipse which tracked across Hawaii before crossing Baja California and Central Mexico. At the time I was working at the Lunar & Planetary Laboratory (LPL) in Tucson following my graduation from the University of Arizona two months earlier. Some of my colleagues were involved in an eclipse observation trip to the totality in Hawaii, and just the day prior to totality I committed with a friend to drive down to Mexico to try to observe it via hand-built pin-hole projection. We got close to the path, however we diverted to a beach we knew a bit shy of the 100% line due to fatigue and didn't go any further on the actual day. No photos were taken, but the love of the event took hold.
More to follow... meanwhile, here's a picture from the 17 August 2017 eclipse, taken in Casper Wyoming with my portable telescope rig:
Sunday, May 6, 2018
5-6 May 18 (a short post)
Successful calibration of the Auto Guider / mount pulse-guiding arrangement The key issue with all my failed calibration attempts was the hot pixels on the guide camera.
I had never done Dark images for the guider, so all previous guide calibration attempts still had hot pixels on the guide images. When running those previous calibration cycles, TheSkyX appeared to use the hot pixels instead of a star for calculating tracking rates.
Choosing a star field with very few stars for guiding, it became clear which area of the guide image was being used for calibration, and it seemed to be a single pixel. This highlighted several consistent pixels across multiple images and made it clear what was necessary. I processed an auto guide image for dark subtraction and subsequently had my first successful calibration.
With the guider / mount tracking rates calibrated, I can now work to optimize the guider settings. Current settings:
min move 0.010 seconds
max move 1.00 seconds
aggressiveness - all are 10
results:
M13 60 second clear, guided image
Saturday, April 21, 2018
More Galaxies
A few recent updates to the rig... Current imaging setup:
Explore Scientific 127 APO triplet
Explore Scientific 0.7 Focal Reducer / Field Flattener
Moonlite Crayford Focuser 2.5"
Also, here is m81 and m82 in a 240 second exposure, also unguided:
Explore Scientific 127 APO triplet
Explore Scientific 0.7 Focal Reducer / Field Flattener
Moonlite Crayford Focuser 2.5"
Celestron Five Position Skyris Filter Wheel
Losmandy G11GT Mount
Orion short-tube 80 (F/5) for guiding
Orion Starshoot Autoguider (SSAG)
Explore Scientific 50mm finder
Thunderbolt 2 dock
QHY Polemaster polar scope
QHY5IIIM174 (for imaging)
Skyshed
Next purchase:
Narrowing down my selection for a new imaging camera.
Galaxies:
Captured M51 on the evening of 16 April. One 4 minute exposure, calibrated with 4 minute dark and a bias image. Missed the opportunity to get flat field images, so I used some old ones for processing, still pretty satisfied with the result for this unguided image.
M51
Another session last night (20-21 April 18) to capture galaxies. Also unguided, but this time I did record some flat field images:
NGC4535
M94
Also, here is m81 and m82 in a 240 second exposure, also unguided:
Sunday, December 24, 2017
24 December 2017
Tried the Orion Bahtinov Focuser today, and I love it... more on that later
Imaged M33 using the QHY5III174M camera with the Orion 80mm f/5 scope and the Star Adventurer mount.
This is a two-minute capture, no filters, just a single monochrome image.
The three-minute capture was too saturated to provide much hope in the available sky-glow.
Tried capturing images using SharpCap 3.0 as well... Looks like a very promising technique, will develop that capability next time.
Also, a single attempt to image of M45 on my friend's 12" dobsonian...
Will work on the images, and edit this post if I can improve on this quick processing.
Saturday, December 23, 2017
ISS Lunar Transit
On 20 Dec 17, the International Space Station transited the waxing crescent moon shortly after sunset, from the point of view of north-western Louisiana. I found this from the very-handy ISS Transit Finder web app:
https://transit-finder.com/
The interface is very easy and the output makes it simple to optimize your selected location within the transit corridor. Here's a re-calculated map for that transit...
Thanks to the professionals at Camp Minden and in particular, SFC Jowers for the support at the location.
Since this worked, I'll next plan for a solar transit as well as another with the big scope.
On 20 Dec 17, the International Space Station transited the waxing crescent moon shortly after sunset, from the point of view of north-western Louisiana. I found this from the very-handy ISS Transit Finder web app:
https://transit-finder.com/
The interface is very easy and the output makes it simple to optimize your selected location within the transit corridor. Here's a re-calculated map for that transit...
Interestingly, it has changed by a couple miles today, versus the calculation I did prior to the actual transit. I don't know if the orbital elements changed since Wednesday or the back-calculation introduces some error...
I used the Orion 80mm (f/5) scope and the QHY5III174M camera again. Here's the video of the transit, at 10% speed, plus a few zoom-ins and a 4% speed playback:
Thanks to the professionals at Camp Minden and in particular, SFC Jowers for the support at the location.
Sunday, December 17, 2017
Northern Lights
My wife and I decided to travel the coast of Norway back in 2011 to view the aurora. As March and October appeared to be the best months to view them, we chose March for a cruise on the Hurtigruten Ferry line from Kirkenes near the northern border southwestward to Bergen. Six days and five nights aboard the MS Trollfjord visiting about 23 ports along the beautiful Norwegian coast provided us with a very memorable vacation.
We had armed ourselves with a Canon 16-35mm II f/2.8 L-series lens for our Canon 5D mark II and hoped the weather (terrestrial and space) would provide some opportunities, unlike the sailing immediately prior to ours which had been socked in with clouds the whole time.
Sure enough, dinner on the first night of the sailing was interrupted by the Captain announcing the presence of the aurora.
This kicked-off five nights of more and more auroral activity, which we did our best to capture on the usually-moving large ferry. Varying the exposure lengths and taking as many as we could while docked at ferry ports produced some images I'm kinda proud of, but the next time we will definitely try to have opportunities by land to improve the chances of crisp image.


Also, here's an interview I did with KTBS on the aurora...
https://www.ktbs.com/news/arklatex-indepth/northern-lights/article_75208998-c11b-11e7-a182-b3aaac7c7335.html
My wife and I decided to travel the coast of Norway back in 2011 to view the aurora. As March and October appeared to be the best months to view them, we chose March for a cruise on the Hurtigruten Ferry line from Kirkenes near the northern border southwestward to Bergen. Six days and five nights aboard the MS Trollfjord visiting about 23 ports along the beautiful Norwegian coast provided us with a very memorable vacation.
We had armed ourselves with a Canon 16-35mm II f/2.8 L-series lens for our Canon 5D mark II and hoped the weather (terrestrial and space) would provide some opportunities, unlike the sailing immediately prior to ours which had been socked in with clouds the whole time.
Sure enough, dinner on the first night of the sailing was interrupted by the Captain announcing the presence of the aurora.
This kicked-off five nights of more and more auroral activity, which we did our best to capture on the usually-moving large ferry. Varying the exposure lengths and taking as many as we could while docked at ferry ports produced some images I'm kinda proud of, but the next time we will definitely try to have opportunities by land to improve the chances of crisp image.


Also, here's an interview I did with KTBS on the aurora...
https://www.ktbs.com/news/arklatex-indepth/northern-lights/article_75208998-c11b-11e7-a182-b3aaac7c7335.html
Thursday, November 30, 2017
Well, it's been a few years, but...
On 23 November 2017 I set out to capture M31 (Andromeda Galaxy) using my latest rig.
Here's a photo of the rig... It consists of a SkyWatcher Star Adventurer tracking mount head on a SkyWatcher wedge, supported by a Velbon tripod. The scope is an 80mm Orion short-tube (f/5) 400mm focal length which I'd gotten as a guide scope for the 12" LX-200.
The camera shown is a Canon 5D Mark II, however I really only used that camera to course-aim the scope. For imaging, I used a QHY5III174 Monochrome camera... For that camera, I used an Orion extender tube to enable focusing.
Waiting for another clear night (probably following the full moon) for another deep-sky imaging night.
Mark J.
On 23 November 2017 I set out to capture M31 (Andromeda Galaxy) using my latest rig.
Here's a photo of the rig... It consists of a SkyWatcher Star Adventurer tracking mount head on a SkyWatcher wedge, supported by a Velbon tripod. The scope is an 80mm Orion short-tube (f/5) 400mm focal length which I'd gotten as a guide scope for the 12" LX-200.
The camera shown is a Canon 5D Mark II, however I really only used that camera to course-aim the scope. For imaging, I used a QHY5III174 Monochrome camera... For that camera, I used an Orion extender tube to enable focusing.
Here's a processed image from the evening...
To get to this image, I first captured a 120 second exposure with the QHY, controlled as an ASCOM camera with TheSkyX. The program saves images in FIT format... To further process I used FITS Liberator to re-save as a TIF file (both as Windows applications in Parallels), then worked levels and histogram scaling with PixInsight (Mac Version). I also used PixInsight to export the images to PNG format for sharing.
Out of curiosity, I examined the image to see what objects I could identify... Below are a few Globular Clusters orbiting M31 which can be found on the image. I used Sky Safari to identify those, and marked them up on the exported PNG image using the MacOS Preview editor function.
Waiting for another clear night (probably following the full moon) for another deep-sky imaging night.
Mark J.
Monday, May 27, 2013
First Image, and OAG repairs
Great clear full-moon nights throughout the weekend. Even on clear nights, the dew forming on the corrector plate each night around midnight pretty-much terminated each session. Just one photo to show for it, but I learned much and configured my gear better than any previous session...
The moon, using my Williams Optics 80mm refractor, piggy-back mounted on an un-guided polar-aligned LX-200 12" scope. I didn't record the exposure time.
So, what did I really accomplish this weekend? First and foremost, I figured out a lot about my off-axis-guider. The Orion OAG is now focused for my reticle 9mm eyepiece (for guiding) and my 5D mark ii, for the first time ever.
Thoughts on the Orion OAG... The prism-adjustment knob is poorly designed, with the net effect of my wasting at least 10 hours trying to get an image of a star into the guiding eyepiece. The prism adjustment screw was incorrectly offset around the prism adjust-plunger, so that the prism remained pointed completely off the optical path of the scope. The knob would do nothing to deflect the prism, hence I saw nothing through the finder eyepiece.
A helpful blog post by Tom Polakis in cloudy-nights from 2004 showed the same problem. I did some minor surgery on the OAG, got the adjustment pin in the correct position, and voila... I now can see images in the eyepiece.
As for the image above, I learned all about Maxim DL's screen-strech functions and saving options to adjust the image to make the details visible. Pre- screen-stretch, nothing was visible except a white circle on the image. The image is noisy, and not ideally focused, but hey, it's a first.
Finally, after sunrise and dew-evaporation, I used some daylight landmarks to finally get the OAG focus adjusted for the two paths. With that accomplished, I'm now ready to do some long-exposure photography on the next clear night. Gotta put all the equipment away now...
Haywood
Friday, May 24, 2013
The first entry in my Astrophotography Blog...
This Blog is intended to be a record of my developing skills, successes and failures in capturing images of the night sky. I'll make a separate entry describing who I am and what my astro-photography experience is... Suffice to say, I have had very few successful attempts to capture images, especially when weighed against the equipment and software I've acquired in my previous attempts. Here's a brief list of the equipment I currently possess:
Meade 12" LX-200GPS-SMT (2004-era scope)
Coronado SolarMax 90 Double Stack Hydrogen-Alpha scope
Meade Ultra-Wedge
Canon 5d Mark II
Williams Optics Zenithstar 80mm refractor
Losmandy dovetail-plate system for the Meade scope
Orion Off-Axis Guider
Meade 1:1.6 focal reducer
Orion Flip Mirror
12volt car-battery charger - powers the Meade
Vixen Alt-Az manual mount for SolarMax scope
Notice there is no dome mentioned in the above list... I have to drag this out and pack it up before/after every observing session. This will continue for at least the next 3 years, so no permanent installations are possible for the foreseeable future.
Late-May weather in VA-permitting, I'll be attempting to improve the collimation on the Meade tonight... So far, the meade's performance has been weak for many years due to my incompetent previous collimation attempts. The replacement of allen-bolts with Bob's Knobs last month has gotten my meade scope as collimated as it's ever been, so I think I've got a good chance during my next session to finally get some quality (for me) images out of the setup soon...
That's it for now. I'll post some previous pictures from our Solar Eclipse trips, Venus Transit images, and the better of my images from the un-collimated equipment I'd been trying to tweak over the past few months.
Thanks for reading, and hope this blog is worthwhile. I realize this may only be read by me, and in that case I hope it serves as a means to collect lessons-learned which I can use to build up my skills.
Cheers,
Haywood
This Blog is intended to be a record of my developing skills, successes and failures in capturing images of the night sky. I'll make a separate entry describing who I am and what my astro-photography experience is... Suffice to say, I have had very few successful attempts to capture images, especially when weighed against the equipment and software I've acquired in my previous attempts. Here's a brief list of the equipment I currently possess:
Meade 12" LX-200GPS-SMT (2004-era scope)
Coronado SolarMax 90 Double Stack Hydrogen-Alpha scope
Meade Ultra-Wedge
Canon 5d Mark II
Williams Optics Zenithstar 80mm refractor
Losmandy dovetail-plate system for the Meade scope
Orion Off-Axis Guider
Meade 1:1.6 focal reducer
Orion Flip Mirror
12volt car-battery charger - powers the Meade
Vixen Alt-Az manual mount for SolarMax scope
Notice there is no dome mentioned in the above list... I have to drag this out and pack it up before/after every observing session. This will continue for at least the next 3 years, so no permanent installations are possible for the foreseeable future.
Late-May weather in VA-permitting, I'll be attempting to improve the collimation on the Meade tonight... So far, the meade's performance has been weak for many years due to my incompetent previous collimation attempts. The replacement of allen-bolts with Bob's Knobs last month has gotten my meade scope as collimated as it's ever been, so I think I've got a good chance during my next session to finally get some quality (for me) images out of the setup soon...
That's it for now. I'll post some previous pictures from our Solar Eclipse trips, Venus Transit images, and the better of my images from the un-collimated equipment I'd been trying to tweak over the past few months.
Thanks for reading, and hope this blog is worthwhile. I realize this may only be read by me, and in that case I hope it serves as a means to collect lessons-learned which I can use to build up my skills.
Cheers,
Haywood
Subscribe to:
Posts (Atom)


